Bullet Identification
Bullets
collected for comparison to a specific firearm are examined first to
see if they are of a caliber
that could have been fired from the submitted firearm. They are
then examined to determine if the pattern of
rifling impressions
found on the bullet match the pattern of rifling
contained in the barrel of the questioned firearm. If
these class characteristics agree the next step is to try to
make a positive match between the individual characteristics
that may have transferred to the bullet from the barrel.
Located
within the rifling impressions on a bullet can be microscopic striations
or scratches like those seen on the bullet below. They
sort
of look like a bar code don't they?
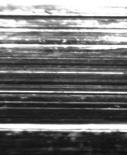
Imperfections
in the surface of the interior of the barrel leave striations on the
projectiles. Striations have the potential to be
consistently reproduced in a unique pattern on every bullet that
passes down the barrel of a firearm. The key word in the
previous sentence is unique.
Firearm examiners will
attempt to find this unique pattern by following the procedures
outlined below.
A submitted firearm will be
fired 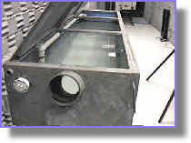 several times
using
a water tank like the one on the left to obtain standards from the
firearm. Lids on the tank are closed and locked and the muzzle of the firearm is placed in the open tube at the end of the tank and
fired. Friction from passing through the water slows the bullets
down and they end up on the bottom of the tank about halfway down its
length. The
tank is approximately 3 feet wide, 10 feet long and 3 feet high. several times
using
a water tank like the one on the left to obtain standards from the
firearm. Lids on the tank are closed and locked and the muzzle of the firearm is placed in the open tube at the end of the tank and
fired. Friction from passing through the water slows the bullets
down and they end up on the bottom of the tank about halfway down its
length. The
tank is approximately 3 feet wide, 10 feet long and 3 feet high.
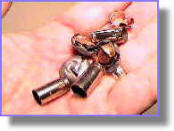
Fired standards, like those to the right, are examined first to determine if
in fact the barrel is producing striated marks in a unique and consistent pattern. Once a
consistently reoccurring pattern to the
marks is identified on standards, the standards are compared to the evidence bullets to see if the same pattern of marks exists on the evidence. To make these
comparisons the firearm examiner will use a comparison macroscope
(below right).
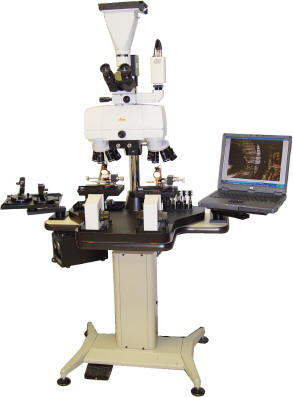 Notice
that this is called a macroscope and not a
microscope. Microscopes typically use
objectives that are 100x and above. Magnifications typically
used in firearms identification are 5X, 10X, 20X, 30X, and
40X. It is not unusual however to see these lower
powered scopes referred to a microscopes. In fact if
you see it referred to as a microscope on this website just
ignore it! Notice
that this is called a macroscope and not a
microscope. Microscopes typically use
objectives that are 100x and above. Magnifications typically
used in firearms identification are 5X, 10X, 20X, 30X, and
40X. It is not unusual however to see these lower
powered scopes referred to a microscopes. In fact if
you see it referred to as a microscope on this website just
ignore it!
All firearm sections will have a comparison macroscope. The
comparison macroscope consists of two macroscopes mounted side by side
and connected
by an optical bridge. There are two stages on the lower part of the
macroscope that the bullets to be compared are mounted on. The
bullets are attached to the stages using some type of sticky
substance. Images of the bullets travel up through the objectives,
bounce off several mirrors in the optical bridge, and are combined in
a round field of view seen by looking into the stereoscopic eyepieces. The
resulting image will show the bullets mounted to
the stages, side-by-side, with a thin dividing line down the middle. The images below show rifling impressions on a 32 caliber bullet
at progressively increasing magnifications.
The stages that the bullets are attached to allow
the bullets being examined to be rotated on their axis and moved up,
down, to the left, and to the right. The
bullets are rotated around to see if any microscopic similarities are
present. Most positive identifications are made on striations that occur
in land impressions and the best marks are usually near the base of
the bullets like those seen below.
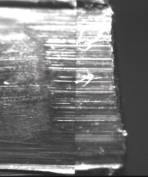
For an animated and
interactive demonstration of this process see the
3-D Bullet Identification
Demo.
Not all bullet
identifications are like those seen in the above image.
Firearm examiners will examine the entire bullet for
striations that agree with the standards. Bullets can
have as many as six, eight or even twenty-two different land
and groove impressions and each one may have areas of
agreement between the striations. Taking an image of
striations, like the one seen above will usually not be
representative of the actual overall positive
identification. It really comes down to the experience of
the firearm examiner and what they perceive to be the
overall uniqueness of the striations that are present.
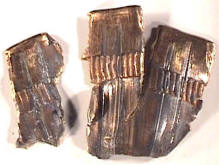
One of the biggest problems
in making an identification is that few evidence bullets are
submitted intact. Most are badly distorted, wiped
and/or fragmented. The fragment seen below may not
look like much but even small fragments and badly damaged
bullets can still retain sufficient marks for an
identification to be made.
Until the
questioned bullet is examined microscopically by a trained firearm examiner
you just don't know if it has marks of comparative value.
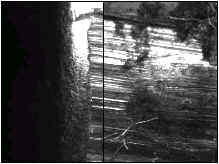
The
comparison image below shows the above bullet fragment (right) compared
to a standard (left) fired from the submitted firearm.
When comparisons are made
between firearms and fired ammunition the results can read as follows:
Exhibit 1 (bullet) was
identified as having been fired from Exhibit 2 (revolver).
This conclusion is
reached after all class characteristics agree and a sufficient correlation
between individual characteristics is found.
Exhibit 1 (bullet) could
neither be identified nor eliminated as having been fired from Exhibit 2 (revolver). All
comparisons were inconclusive.
This conclusion is
reached if class characteristics agree but there is an insufficient correlation
between individual characteristics.
Exhibit 1 (bullet) was not
fired from Exhibit 2 (revolver).
This conclusion is
reached if class characteristics disagree.
Additional
examples of bullet comparisons can be found in the image
galleries.
In some
cases, a firearm may not be recovered for comparison. When this
happens firearm examiners can examine bullets for general
rifling characteristics (GRC) in an attempt to determine
what brands of firearms from which the bullet may have been fired.
Check the GRC links above for more information on this type of
examination.
We have now
discussed how bullets can be identified as having been fired from a firearm but
what about the cartridge cases.
Click
the Next button below to learn about Cartridge
Case Identification.
|